Showing posts with label diy projects. Show all posts

Tuesday, June 23, 2009

DIY External CO2 Diffuser and Inline Heater


I love DIY projects. There's just something way more satisfying when you complete something yourself. I was pretty excited when I found these DIY project ideas on Instructables, an external CO2 diffuser and an inline heater using a water filter housing. The idea is simple and aside from having to purchase a heater with an external thermostat (so you don't have to open up the CO2 diffuser every time you want to adjust the heater temperature) looks to be pretty cheap and effective. I'm all for removing equipment from aquariums since no one likes have a nasty looking heater spoil their aquascape, and placing it inline after your filter can even make it more effective. Once I'm recovered from my big move, I might have to give this a try. Great job thewhite!

Saturday, January 17, 2009

Creating a DIY Fertilizer Auto Dosing System

I always thought creating your own DIY system to auto-dose fertilizers would be complicated and expensive. Turns out, it's not at all. The best part is, my aquarium has been doing so much better since I added this system, mainly because I don't forget to add fertilizers anymore! Total cost of this system is about $30-50 and an hour or two. It's a perfect weekend project! Here's what you will need:
  • A plastic container, clear. I used a "dry-goods" container, but any container that holds liquid and is large enough will work.
  • A powerhead or pump. This should be small enough to fit inside the container you've got but also strong enough to pump liquid into your tank (especially if you will be storing the fertilizer tank under the aquarium as I did). It also should have an intake on the bottom.
  • Tubing to fit your powerhead outlet. Only a small length is needed, a few inches max.
  • Airline tubing.
  • A plastic dropper (as found in Seachem liquid fertilizers).
  • A digital timer, or any timer with the ability to be set to 1 minute intervals.
First, start by modifying your powerhead. Attach the tubing from the outlet of the powerhead to the modified dropper. The dropper I've used fits perfectly over the tubing once the large end is cut off and creates and "adapter" from the large tubing to the airline tubing. I used a clamp here to prevent the tubing from coming loose from the powerhead, but it's probably not necessary. This step may take some fiddling around to find the right diameter tubing, but it should be relatively standard (I believe I used 1/2 inch tubing). Forgive the "stripes" (dried fertilizer solution) on my powerhead in the photo, it's been in use for a few months now!

Then, hook everything up (airline tubing to dropper-adapter), place the powerhead inside the plastic container and fill it with plain, de-chlorinated water. Set it up exactly as you would if you had put fertilizers in it. Make sure the airline tubing opening sits above the water line in your tank or you may unintentionally start a siphon and have a big mess! Alternatively, you can use an in-line check valve, however, my powerhead wasn't powerful enough to push the fluid past it and all the way up to the top of the tank.

Most timers have a manual override which we'll now use to simulate a minute run. Plug your powerhead into the timer. Just watch a clock and run the pump for a minute on and then turn it off. Mark the side of the container with a line. This indicates 1 dose. Keep doing this until the container is empty or nearly empty. This is the most tedious step and requires the most attention, since the more accurate your measurements are, the more accurate your dosing will be.

Now count how many doses you have and this is how many days you can run your auto doser before having to refill it. Mine ended up being about 28 days worth. Then, just use this number of days to calculate how much fertilizers you would dose in the same period, and add it to the container. Do not add phosphorous to the mixture if you are adding any type of iron fertlizer! This is because they will react. So I just dose nitrogen, potassium, trace elements (including iron), and Flourish Excel in the auto doser, and phosphorous separately. Add de-chlorinated water, mix it up a bit, and hook everything up again and you're good to go! Set your timer "on" time for 1 minute before the "off" time. Doesn't matter what time of day, though most people will tell you that right before "lights on" is best. Every day, the timer will turn on for 1 minute and dose 1 days worth of fertilizers to the tank. Just remember to check on it now and then to make sure everything is working as intended.

This is probably the best DIY project I've ever done in terms of impact. Makes keeping a high tech aquarium so much easier!

Monday, June 09, 2008

DIY Fertilizing for the Planted Tank

Most planted tanks will require some fertilization at least now and then. For tanks that are light on nutrients and slow growing, buying pre-mixed fertlizer products, such as SeaChem's line of Flourish fertlizers, isn't prohibitively expensive. However, if you have a high-light, fast growing tank that sucks up nutrients rapidly, buying these products can quickly break the bank. This is where dry fertlizers come in.

Dry fertlizers are much cheaper and can be bought in bulk. They allow you to mix in different amounts of each nutrient to tailor it for your tank. However, using dry ferltlizers takes some knowledge of both chemistry and biology.


Plants need lots of different nutrients to grow, and aside from hydrogen and oxygen which they get from water directly, they mainly need carbon (from CO2), nitrogen, potassium, and phosphate (also known as macronutrients). These occur naturally in water to some degree, but in high-growth aquariums will be used up rapidly. When this happens, growth stunts and algae takes over. To comabt this, we use fertilizers.


The most common dry fertlizers are KNO3 (potassium nitrate), K2SO4 (potassium sulfate), and KH2PO4 (mono potassium phosphate). As you can see, these three provide the basic macronutrients. These can all be found readily online and quite inexpensively. However, it can be very confusing to determine just how much to put into your tank. This depends greatly on every single factor affecting the growth of the plants in your tank (light, CO2, other trace elements present, etc).

One way to figure out how much to use is to start off slowly and measure the levels of nitrates and phosphates to see if your plants use up what you put in. For example, test your water for nitrates, record the level, and then add a small amount of KNO3. Re-test the nitrates immediately afterwards and record the level. Then re-test the water in a day or two to see how that level compares to your first reading. If it's back to the first reading, your plants have used up all of the nitrates available, and you might need to add more next time to prevent the nitrates from "bottoming out."


An alternative to all this testing (which requires testing kits and lots of close observation) is to simply estimate and use a weekly water change to "reset" the nutrient levels. Use a fertilizer calculator, such as the Fertilator, to determine roughly how much your aquarium needs. Then, try it out for a few weeks, making sure to do the weekly water change to eliminate any excess. If you notice extra algae or stunted growth, you might need to adjust your routine. Test kits can help identify the culprit.

Either way you measure out your ingredients, you can either put the dry nutrients directly into your tank or create a pre-mixed solution (like the products available at fish stores). Either works well, however making a pre-mixed solution often makes adjusting individual nutrient amounts a headache, and often the solution will need to be refrigerated to prevent unwanted growth if not used quickly (it is a pure nutrient bath after all!).


The most difficult part of doing your own fertilization is probably figuring out how much to add. Whichever way you figure this out, once you have a routine down, you'll be saving money and have much more control over your aquarium!

Tuesday, May 20, 2008

Cheap Scapes: Collecting Your Own Driftwood

Just like with rocks, you can save money by finding your own driftwood. Wood you can buy in a pet store is often expensive and not all that natural looking. However, there are three issues that must be overcome before putting any "found" wood into your aquarium: buoyancy, tannins, and hardness.

Wood is naturally buoyant. That's why you see some driftwood with large slate weights on the end in pet stores. However, if it is submerged for long enough, it becomes filled with water (waterlogged) and will sink. This process can take a fair a mount of time, and if the wood is removed from the water for too long, it will dry out and need to be re-soaked.

Wood also contains tannins. Tannins will turn your water brown and acidic. Although not necessarily bad for certain types of fish and plants that are used to living in tropical rivers and bogs (where wood routinely falls into them), it can be unpleasant to look at and can smell (like a bog...naturally).

Finally, wood will eventually rot in water. Different types of wood rot at different rates, and in general, the harder the wood, the longer it will take to rot. The hardest woods can last for hundreds of years underwater (like oak), but softer woods can begin to rot in just a few. You should be fine as long as you don't choose a really soft wood, but just keep this in mind, and don't choose a piece that is already rotting on its own!

All three of these issues can be overcome by sourcing your driftwood from a lake or river directly. It is usually already water logged, the tannins have leeched out, and you know it won't rot too quickly. All you need to do is sterilize it by boiling it.

However, if you can't get your wood from a lake or river, here are some tips and methods to make it safe for your aquarium.

  • Choose wood that is hard wood. Stay away from pine, cedar, and elm! Also, weathered, unique wood makes for a better aquascape than a hunk of wood.
  • Wash any debris or bark off your wood.
  • Boil your wood for 2-3 hours. This will accelerate the process of water logging the wood and leeching the tannins out. It will also sterilize the wood and prevent any unwanted guests from wreaking havoc on your aquarium.
  • Soak your wood in a container of water for about a week before putting it in your aquarium to let the tannins leech out. This will also help to water log it so it won't float to the surface. You may need to put a few rocks or something heavy on top of the wood to keep it submerged. The water will turn a light brown color as the tannins leech out.
  • Once your wood sinks naturally, rinse it off and it is ready to be put into your aquarium. If it is still not sinking after a week, continue soaking it until it does. The amount of time it takes varies on the density of the wood and how large of a piece it is.

Enjoy your free driftwood!

Friday, March 28, 2008

Cheap Scapes: Collecting Your Own Rocks

Who ever though they'd be paying good money for a rock when they started an aquarium? Yet many of us do. After discussing ways to save money while creating a beautiful aquarium in the last post, I touched upon collecting rocks yourself to use in your aquarium to save money. I've decided to continue the budget aquascaping theme with a post on collecting your own rocks to use in your aquariums. If you're lucky enough to live in or near an area that has appropriate rocks, this can be a great money saver and add a unique flavor to your aquascape. Sure, you'll get some strange glances as you lug a bag of rocks back home, but it's worth it!

It can be difficult to find rocks locally that "fit" into an aquarium. Some will just look out of place underwater. The best rocks are those found in or near water. Rivers, streams, and lakes are the best source. These rocks often have more rounded edges and will look more natural in the aquarium. Since they also are often worn smooth, you will have less of a problem with algae or detritus collecting on the rock. Finally, since they have been under water before, they are most likely (although not always) safe to put in your aquarium.

This brings up several important things to remember when putting rocks in your aquarium.
First and probably most important is the fact that some rocks just aren't suited for aquariums based on their composition. Certain chemicals contained in the rocks can leach into the water and play havoc with your water parameters. Some, like calcium carbonate or magnesium carbonate, will make your water hardness go through the roof as the elements dissolve into the water. Marble, limestone, coral, dolomite, or anything similar will do just that. While it's possible to live with rocks that impact your water parameters (Amano scapes often use such stones) in the long run, it just isn't worth it. Rocks with obvious metallic seams in them should also be avoided as they can also leach harmful substances into the water. A decent (although somewhat dangerous) method of testing whether or not a rock will dissolve into your aquarium is to put a few drops of acid onto it (strong vinegar or muriatic acid; be careful!) and see if it foams or fizzes after a few minutes. If it does, it likely contains an element that will affect your water parameters.

Second, rocks come from an outdoor environment. They can carry all sorts of dirt and substances on them that may be harmful to your aquarium's ecosystem. What I do is wash them thoroughly under running water with a mild soap to remove any loose dirt and oils. Then, I put them in a pot of water and boil them for a while. This kills any living things on the rock that I may not want in the aquarium. After the rocks have cooled they should be ready to be placed into your aquarium.


Using this knowledge, and a basic understanding of geology, it's possible to find unique and interesting rocks locally for your aquarium. Best of all, they're free!

Wednesday, October 25, 2006

Build Your Own Yeast CO2 Generator

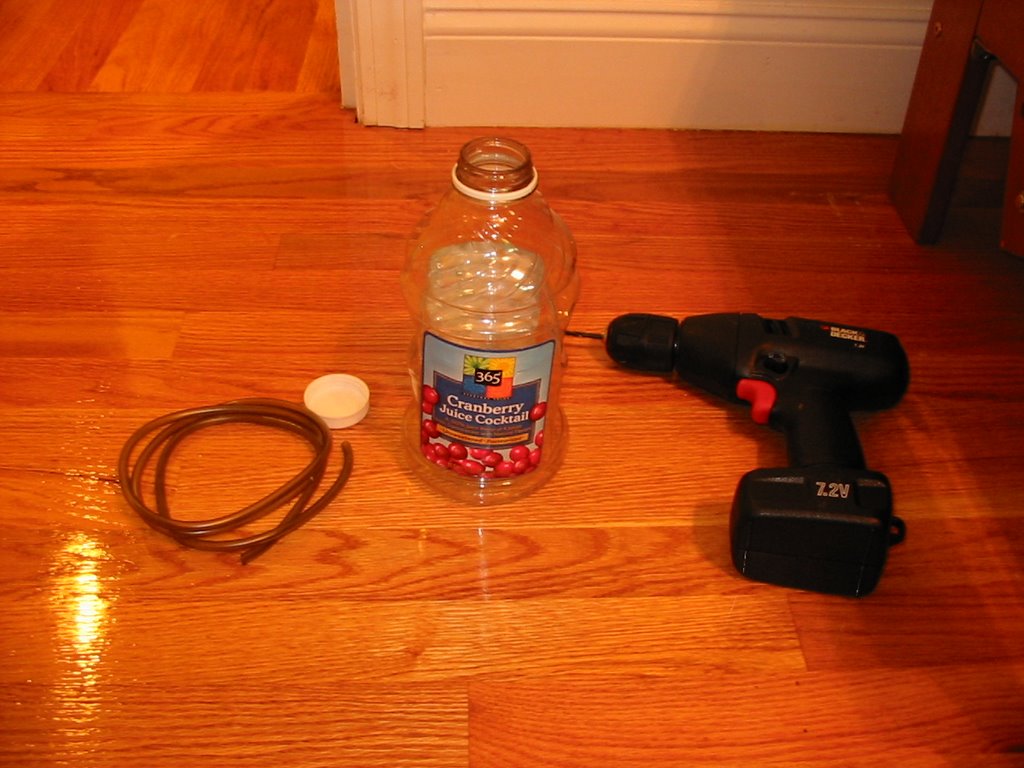
The easiest way to provide your planted aquarium with CO2 gas (a vital fertilizer) is to make your own yeast powered CO2 generator. This can be done very easily and inexpensively (all you need to buy is tubing and the supplies for the yeast recipe). Below are the tools and supplies required:


Any juice container will work, or any container with a tight fitting lid for that matter. However, some containers work better than others. I've always had good results with juice containers whereas some of the othe containers I've tried (like the big iced tea jugs) don't make an airtight seal when closed. You can use any size, however 48-64 ounce containers are a good size. They fit the 2 cups sugar called for in most recipes and don't take up a huge amount of space. The bigger the generator, the more water there is which dilutes the alcohol byproduct that eventually kills the yeast, so larger containers will last longer as long as you add the same amount of ingredients. The tubing can be any kind of airline tubing, however standard airline tubing will eventually go hard and crack from exposure to CO2. Using silicone or CO2 resistant tubing is best. A drill is nice, but if you don't have one, the same result can be acheived with a nail or screw.

Step 1
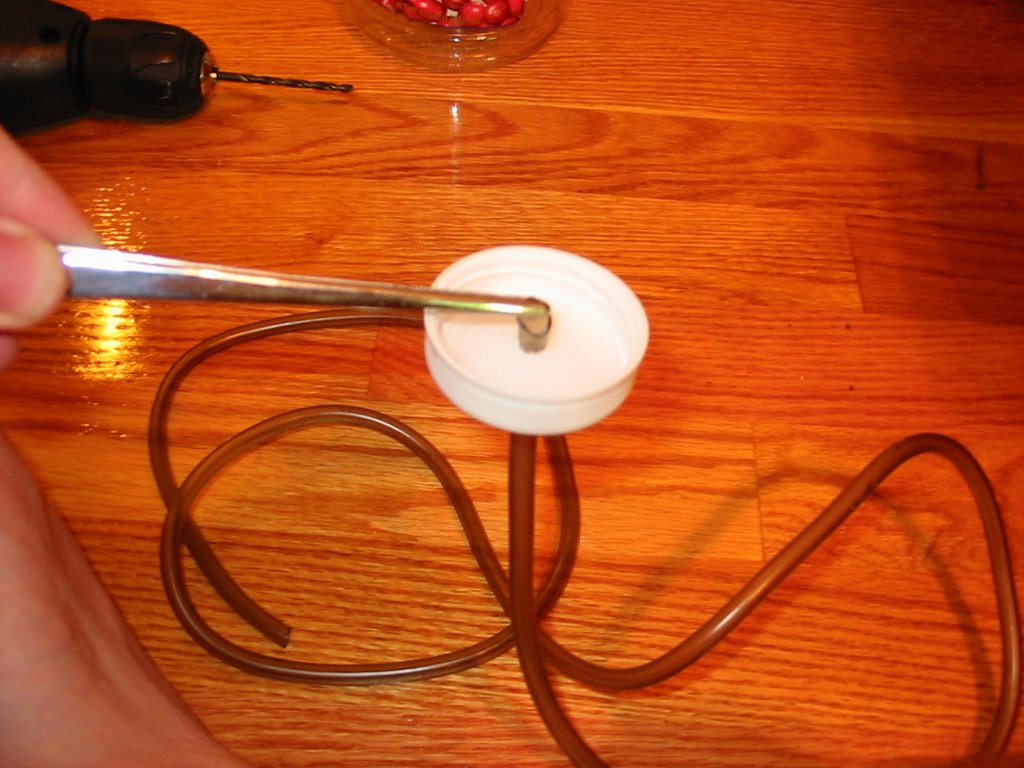
Drill a hole in the lid smaller than the diameter of the tubing, but large enough so you think you'll be able to squeeze it through. I use a smaller drill bit and then widen the hole with a pair of aquarium tweezers. Remember you can only make the hole larger, so don't get overzealous.

Step 2
Cut the end of the tubing on a diagonal and push it through the hole in the lid as shown, using tweezers or pliers to grab it on the other side and pull it through. If it doesn't seem to fit, make your hole bigger. If you don't need pliers or tweezers, the hole is too big and CO2 will leak out. If this happens, you need a new container (or at least a new lid). Pull it through only a half an inch or less.


Step 3
This is the finished cap and tubing. The seal should be tight enough to prevent leakage. There is no need for glue or silicone if it is done right. Just screw the lid on and you're ready to mix up your yeast solution!

The Final Product: A DIY Yeast Generator

There are a few important things to remember about DIY yeast generators.
  • First, they are under pressure. Although it is highly unlikely they will burst, it does happen if the tubing gets clogged. Make sure the gas has a clear path to your tank. Some people add a check-valve between the tank and the generator to prevent yeast bubbles and goo from going up the tubing. Personally I've never had this happen and adding a check valve only makes another possible leakage point. As long as you don't overfill or shake up your mixture, it shouldn't get into the tubing.
  • Also remember that if you squeeze the bottle (even gently), once you release it, it will suck up aquarium water. This can form a siphon and once it does, aquarium water will flood your generator. This will ruin the reaction (other bacteria and organisms in the water will out-compete the yeast) and can make a big mess. So be careful and set the generator down before screwing on the lid and connecting it to the tank.
  • Finally, a DIY yeast generator is a rather low powered CO2 generator, so diffusing all that CO2 most effectively and stopping leaks is paramount. One leak can make the whole thing not work. A cheap idea for diffusing the CO2 in the tank (called a reactor) is to put the tubing from the generator into the input of a powerhead or canister filter. The impeller will suck up and pulverize the CO2 bubbles, creating a fine mist that will dissolve much faster. Look for an article soon on the different type of CO2 reactors!

Thursday, September 21, 2006

DIY CO2 Recipe: Duration vs. Intensity


The second most difficult part about adding a yeast-powered CO2 system to your planted aquarium, after ripping all your hair out trying to find where its leaking (see our article on building your own CO2 generator for step by step instructions on how to avoid this), is to find a recipe that fits your CO2 needs. You can find all kinds of recipes and resources online that tell you to boil containers, add baking soda, use honey, brown sugar, and all sorts of other crazy things. Take it from me: I've tried these and I still keep coming back to a basic recipe and procedure. The main thing to remember is that depending on what proportion you add the ingredients, you will either get very intense CO2 production for a short period of time, or milder CO2 production for a longer period of time. If you add more sugar and yeast, the CO2 production will be more intense, while adding less of both means it will last longer. This is because as yeast create CO2, they produce alcohol which eventually poisons the yeast and kills it. A smaller amount of sugar and yeast means the whole process is slowed down and lasts much longer. I opt for this type of mix, only because I find it a pain to replace the mixes every week, let alone every few days! My recipe usually produces CO2 at a fairly regular rate for about 14 days. It will continue to produce CO2 for at least another week or so, but it will produce less and less each day. This recipe works well in containers of roughly 2 liters (soda bottles, juice containers):

Ingredients:
2 cups sugar

1 tsp baking soda

1/2 tsp yeast (regular dry baker's yeast is fine, see picture)


  • Start with a small cup or bowl and add a small amount of lukewarm water and a pinch or two of sugar. Mix in the yeast with a fork, stirring vigorously until the water is bubbly. This will help to "activate" dry yeast by adding oxygen, preventing mass die-offs that occur if you just dump the yeast into the water. Let this sit while you prepare the container, or for at least 10 minutes, and stir every few minutes to keep the water oxygenated.
  • Rinse out your container if you have used it before to remove all traces of alcohol. Fill it about 2/3 of the way with lukewarm water. Tap water is fine.
  • Using a funnel, add the 2 cups sugar and the baking soda to the water in the container. If you've used the container before, it's likely you don't have a lid you can use to close it up and shake it, so just put the palm of your hand over the opening and turn it upside down over the sink and shake it gently, making sure to keep the seal with your hand. The point is just to dissolve most of the sugar in the water (otherwise it will just sit on the bottom). If you haven't used the container yet, wait to drill a hole in the lid till after you've shaken it up, just to save yourself a sticky hand.
  • If it's been about 10 minutes or longer, pour the yeast and water mixture into the container using a funnel. No need to mix it up, just put the lid on and it should start producing CO2 in anywhere from a few hours (I've had it start in around 1 hour!) to 12 hours depending on how well you activated the yeast.
If you don't have any bubbles after 12 hours, you've probably either got bad yeast or leaks. A leak is much more likely in a DIY setup like this and trust me, it will make you reconsider plunking down $300 for a pressurized CO2 system.

Wednesday, September 20, 2006

Cheap Lighting for Plants: CF Sprial Bulbs

Cheap, high-output lighting options for smaller aquariums are hard to find. Most are at least $80+ and if you've got a smaller aquarium, it's usually because you don't have the money (or the money for more space) for a larger tank. So, here's a cheaper alternative: Compact Fluorescent Bulbs in an Incandescent Hood. Using CF bulbs, you can put together a lighting unit that can give you up to 50 watts in the space of a 12 inch strip light. The benefits of such a unit are a low cost and comparatively high output and you don't have to buy the bulbs from an overpriced aquarium supplier. For this unit, you need:

  • An incandescent strip light - You can use either a full hood like the All Glass Economy Glass Hood (these usually only come in a 10 gallon size) or just the strip light, like this Perfecto Incandescent Strip Light. The benefits of the strip light are that it can be moved and used on any size tank, but it is harder to find in local pet stores and you need to either suspend it (not recommended) or put it on a glass top. It usually costs about $20.
  • 2 Full Spectrum Compact Fluorescent Bulbs - You want the screw in variety, not the ones with pins at the base. They also must not be larger in diameter than the light strip they will be used in. Usually, a 25W bulb is about the largest that will fit, unless you can find the non-spiral U-tube variety: then length and the maximum wattage of the strip is the limiting factor (most are 2 x 25W max). These bulbs are quite hard to find in a full spectrum color temperature. Wal-Mart stores often carry a "Lights of America" brand that offers them in Daylight 5500K. Alternatively, many online light bulb sellers, such as 1000bulbs.com or SpecialtyLights.com offer them in spectrums that will work.
There's no altering or assembly required, just screw in the CF bulbs, put it on your tank and off you go! There are a few important things to remember though. Do not expose the bulbs directly to the water. There should be glass or something in between protecting them from water splashes and condensation. Also, the higher wattage bulb you use, the more heat will be generated (more on this below). In a warm climate with no way of cooling the tank, this may cause temperatures to rise to unhealthy levels. This approach certainly offers the most "bang for the buck," but it is not the most efficient means of lighting your tank. Spiral bulbs are less efficient than linear tubes because light exiting the tube has the possibility of reflecting back into another part of the tube, or may just enter another part of the tube directly. This causes light loss and heat buildup and is known as "restrike." So all 50 watts are not entering the tank, but instead some light is being lost in the bulb itself. I haven't been able to figure out or find a figure on just how much light is lost, but it's not so significant that the light output is seriously diminished. The incandescent hoods often don't have any sort of reflector in them (some have a small metal reflector, but it doesn't do much) so some of the light is lost when it is absorbed by the light housing. Regular tin foil can be used to line the housing behind the bulbs which will slightly increase the light getting into the aquarium, but it will block ventilation, causing the bulbs to run much hotter and reducing their life.

If you are looking for the cheapest lighting option with the highest light output, you should consider a CF Spiral bulb unit. Be aware that it is not the most efficent option, many systems are available that offer highly polished and engineered reflectors that give you the same results with a lower wattage because more light is actually getting into the tank. However, these will definitely cost you more up-front.

Pros: Best "bang for your buck" for smaller aquariums, easy to replace bulbs


Cons: Uses more power, creates more heat, less light actually gets into the tank


Total cost: $48: $20 for Incandescent Stip Light, $8 per bulb, $20 for glass hood/canopy

Popular Posts

Sponsors

PetSmart

Planted Aquarium Books