Saturday, September 30, 2006

Eheim 2217 Review


The Eheim 2217 is the largest of the Classic series you can buy. It's rated at 264 gallons per hour and the filter itself is a hefty 6 liters (roughly 1.5 gallons). This is significant because the volume of the filter container determines how much media you can put in and the more media, the more filtering capacity. Many people mistakenly think that the flow is what determines what size tank a filter can handle. Although this holds true in some cases, larger filter volume will always mean larger filtering capacity. It doesn't matter how fast you push water through a tiny container, it will only have so much media that can do the job. Although the 159 gallon rating may be a bit optimistic (like the 2213's 66 gallon rating), this filter can certainly get the job done on any tank below its upper limit.

If anyone asks you why an Eheim is one of the best filters available today, you can point to the flawless German engineering and efficiency. The 2217 only uses 20 watts to push all that flow; comparable filters use 25 or more. There is also absolutely no bypass. The way the filter is designed
means that all water must pass through the media. Any dirt that gets sucked up by this filter remains in the filter.

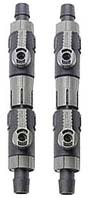
The quality of the parts and construction is top notch. When you clamp the lid onto the container, you know it wouldn't leak, ever. Not even if you tried. In fact, you can even run it without half the clamps and it still won't leak. Priming the 2217 for the first time can be a bit of an ordeal (like any of the Classic series). These filters don't come with any of the fancy self-priming buttons or levers, but they do come with double-tap valves, which make all the difference. However, the first time you set it up, you will funnel (Eheim sells a bulb to do this) or, with much regret, suck on the intake tube. Once you have it filled and running, all you have to do is close the valves on the double-tap connectors, unplug the filter, then separate the connectors. The water remains in the tubing and in the filter, so when you're finished, just reconnect everything, open up the valves, and turn it on. No priming ever again!

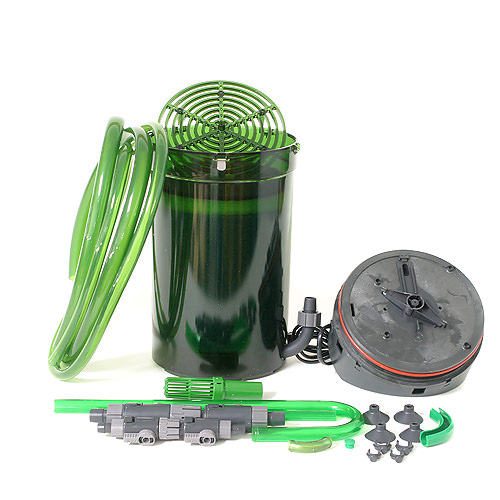
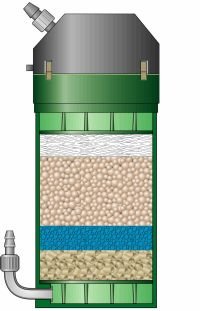
My 2217 came with free media, as I think most do at this point. It came with 1 fine pad, 1 coarse pad, 1 carbon pad, Ehfimech, and Ehfisubstrat Pro. These are all top notch, and the Ehfisubstrat Pro is specially shaped so it doesn't compact and clog. They provide mechanical, biological, and chemical filtration. Again, nothing gets by this media. It also came with tubing and tubing accessories including a spraybar, an intake tube with strainer, and suction cups. It includes a plastic elbow piece which I believe is an alternative to the sparybar, but quite frankly, if you decided to use it it'd be like putting a fire hose in your tank; heaven help the poor fish who unknowingly swims in front of it.

Eheims are probably the best filters you can buy, if you have the money. The 2217 usually retails for around $150 but is well worth it, as these filters have been known to last for decades. I give it five out of five fish:


Pros: Efficient, high quality, no bypass, large filtration capacity

Cons:
First time priming can leave a fishy taste in your mouth

Buy the Eheim Classic Canister 2217 now at Drs. Foster & Smith.

Filters Have Arrived!

Well tonight I picked up my filters from the post office and brought them home. To refresh your memory, they are an Eheim 2217 and a Unimax Pro 250.

I took out the Unimax first just to see what it was like. I was very impressed. It wasn't cheap feeling or looking, the media was all there, and I immediately set about rinsing the media to get it ready. I thought it a bit odd that I found a piece of glass in the canister, but started filling it up to rinse it out anyway. I should let you know, this is a filter with a built in UV sterilizer. Anyway, long story short, it starts leaking as soon as it reaches a certain level. I put two and two together and take a peek inside the quartz sleeve of the UV sterilizer, and sure enough there's a crack and a hole with a few pieces missing. DAMN!


So now I don't know what to do. The filter was bought used, so I don't know if it was already broken or if it was broken in transit, but my money is on the proud workers at the USPS, who, by the way, took about 20 minutes this morning trying to find my packages, and only looked for two after I pointed out there were two explicitly listed on my claim slip. Grrr.

So, disappointed about the Unimax, I started setting up the 2217. I already have a 2213 so I know the drill, but if it's your first time, the directions might as well not be translated. It can get a bit confusing. My first impression of the 2217 was "Wow, this thing is huge!"

Anyway, I'll write a full review and setup guide on the 2217 tomorrow morning and keep you posted about the status of the Unimax. I'm hoping I can order a part (or have one sent for free!) from Aquael, the manufacturer, in Poland. Luckily its an easy piece to replace. Wish me luck!

Thursday, September 28, 2006

Blue Ram Spawn Diary: Day 3

Well, bad news. I came home from work tonight and all the babies are gone. I'm guessing the female must have eaten them, because they are nowhere to be seen. I was afraid something like this would happen. Usually when the female is ready to spawn again she will eat the fry, even though it's only been about a week and a half since she must have laid the eggs. Either that or since it was her first spawn to hatch maybe she just doesn't know better yet.

Some other aquarists have pointed out that usually the male is the one who takes care of the fry once they've hatched. It's kind of odd that the female even took care of them at all, so maybe that's why they are gone. Maybe she killed the father? He didn't look very beat up, so who knows.

Either way, this has once again inspired me and I'm going to see if I can find a healthy male ram tomorrow. These fish truly are wallet drainers. Just when you get fed up with them, they give a little bit more and offer a glimmer of hope. Then when something doesn't go according to plan and you're thoroughly excited for baby rams, you have no choice but to spend more money to keep it going. Eventually I'll get there...

Wednesday, September 27, 2006

Blue Ram Spawn Diary: Day 1 & 2

I never thought it would happen, after trying time after time, but my Blue Rams have spawned and the eggs have hatched! I noticed when I came home lastnight the female was in the midst of a cloud of little bug like things. Ignore the algae and sorry state of the tank, the female ram hasn't let me clean anything up or trim since she first spawned, attacking my hand or whatever else I put in there. Now I know why!


Unfortunately, a few days ago I lost the male. When that happened, I pretty much resigned and said no more, after 4 out of the 6 of these fish I've ever bought have died. Of course, as soon as I give up, I have baby fish everywhere. I didn't even know they had spawned again. They hid the eggs very well. It's such a shame the male died though, he was such a nice fish! I guess these are his legacy. Hopefully some will survive.


I'll keep a journal on here as to their progress. So far, they're just little tiny things with big eyes. They stick mostly around their mother, who feverishly scoops up stray babies in her mouth, cleans them off, then spits them back out into the school. It's very entertaining to watch. The babies are quite strong swimmers and can hold a school pretty well. The big issue now is if they find something small enough to eat. I have baby fry food but it's too big for them yet, so I'm hoping there is enough food in the tank in the form of infusoria (miscellaneous little bugs). The mother attempts to feed them by chewing up her food and spitting it towards them, so maybe that will work.

This is so exciting! Forget all my algae woes, I've got a family to feed!

Tuesday, September 26, 2006

Coralife 130W 24 inch Dual Linear Strip Light


When picking out my very first light for a planted tank, one thing ruled supreme: low cost and high output. I hadn't yet discovered spiral CF bulbs, so I went with a Coralife unit. I ordered the dual bulb 24 inch 130 watt strip light with 6500K bulbs. It was $119 not including shipping and handling. Of course, this was for a 29 gallon tank, which is 30 inches long (one of the most popular lengths for tanks and yet still no 30 inch bulbs?) so I had to buy a glass canopy for it as well, since the mounting legs wouldn't work. It was easy to set up, no assembly required, everything is ready to go. It has two seperate power switches: one for each bulb.
It's been running on my tank for almost 9 months now and overall I'm satisfied with it. It's not stunningly bright despite its 130 watts, probably due to a low-tech reflector. Some of my plants in the deeper parts of the tank had a bit of trouble not getting enough light. It does produce a lot of heat though (a telltale sign of light-absorbing restrike) and Coralife has put in cooling fans to keep it from burning up. Unfortunately, their thinking ahead stopped there, because the fans are pitiful and noisy. It is by far the noisiest piece of equipment on all of my three tanks. The housings around the fans are wiggly and tend to vibrate all over the place. These are the only two areas where the low price of this unit really comes through. Otherwise it's a great first upgrade light if you have a deeper tank like a 29 gallon. I don't really see any other standard application for the light, since it would be far too much light for anything smaller, unless you have a ridiculously deep tank. Overall, I give the unit four out of five fish.

Pros: Low cost, high output, nice looking metal housing

Cons: Noisy fans, low-tech reflector which causes lots of light loss and excess heat
Buy Coralife Aqualight Double Compact Flourescent Strip Lights at Drs. Foster & Smith now.icon

Clown Loach - Botia macracanthus


Common name: Clown loach
Scientific name: Botia macracanthus
Geographic location: Indonesia, Sumatra, Borneo
Size: Up to 15cm (6 inches) in captivity, 38cm (15 inches) in the wild
Temperament: Peaceful
Conditions: 75F-85F, pH 7.0-7.5
Skill level: Intermediate
Minimum tank size: 30-55 gallons

The clown loach is one of my favorite fish because of its antics and color. These loaches are diurnal (come out during the day) and go to sleep at night, literally. They find a nice nook to wedge themselves in (preferably in multiples of 3) and sleep all night, often on their sides or even upside down! Don't worry, they're not dead. They are a schooling fish and should be kept in groups of 3 or more so they have company. They are peaceful and are a great community fish, as well as having the added bonus of being a great snail eater. Although they won't likely eliminate all snails, they will keep the population in check. They need a larger tank, at least 30-55 gallons. They grow slowly, but will grow out of most tanks below this range. Bigger is better.

Clown loaches are very prone to disease since they have no scales. Ich is the most common ailment, and often they are seen in the pet store covered in ich spots (makes my blood boil). It is almost guaranteed that after you get them home they will come down with it. These poor things are sensitive to ich medication as well, so only use a half a dose to treat it if you need to. Otherwise, they are easy to take care of. The best place to buy them is a local pet store, as shipping them may stress them out, causing them to lose their color and fade. This is often irreversible.

Breeding these fish is next to impossible. Some say they don't even reach sexual maturity till they reach 30cm. Either way, very few accounts of them breeding in captivity have ever been heard of, so don't count on little baby loaches (although that would be just about the most adorable thing ever).

Overall, these fish are full of personality and add a splash of color and entertainment to any aquarium large enough to hold them.

Monday, September 25, 2006

Good Snail, Bad Snail

After algae, nothing brings an aquarium enthusiast to his or her knees like snails. They multiply like rabbits, only worse. Many are hemaphroditic, meaning they don't need to find a mate, they just replicate themselves. They are nearly impossible to irradicate unless you totally strip down your tank and start over. They can even mow through our precious plants.

But are snails pure pest? After all, they do tend to have a voracious appetite for the number one enemy, algae. They also eat unmentionables that fish and shrimp leave behind, helping to break down waste. Some, like Malaysian Trumpet Snails, even aerate the substrate by digging into it, making it more hospitable for beneficial bacteria. However, if their population gets out of control, it doesn't make for an attractive tank. After all, sails aren't the prettiest things to look at.

Obviously, some are better than others and many people have different opinions about which ones are good and which ones are bad for a planted tank. Most say Malaysian Trumpet Snails are harmless and the most beneficial for a tank. Pond snails are some of the worst: if you get even one in your tank, there will be 40 by the end of the week. Then 1600. Then 64,000. Well not exactly, but you get the point. My advice: stay away from all of them if you can. This is, however, nearly impossible. Eventually some eggs (they just have to be transparent) will make their way into your tank with a new plant. To control snail numbers, reduce feeding, eliminate algae, or manually remove them. It's not the most pleasant thing to do, but crushing them also gives your fish a tasty snack once they are broken open. Do not use snail killing chemicals because these will kill all sorts of other things, possibly other fish and plants. Or, you can get a snail eating fish, like a loach.

2006 AGA Convention

Just thought this may interest some of you:


"Aquatic Plants Central wants to bring your attention to the Aquatic Gardeners Association 2006 Convention in beautiful San Francisco, California. This year the convention is graciously hosted by the San Francisco Bay Area Aquatic Plant Society.

The speaker line up features Ole Pedersen from the University of Copenhagen, Troels Andersen of Tropica, Jeff Senske (of Aquarium Design Group), Dr. George Batten (Research director of Seachem), Eric Do (ofSFBAAPS), Ricky Cain (of DFWAPC), and the AGA's own Dorothy Reimer!"

The convention is from November 10-12, 2006. I wish I could go!

Saturday, September 23, 2006

Limnophila aromatica


Common name: Rice paddy herb
Scientific name: Limnophila aromatica
Geographic location: Southeast Asia
Temperature: 70F-85F
pH: 5.0-8.0
Light: High (3WPG+)
Growth: Moderate
Difficulty: Moderate

L. aromatica is a very pretty plant for the aquarium, and it is easy to grow as well, provided you have enough light. It looks similar to the much harder to grow P. stellatus or L. inclinata "Cuba" with whorls of reddish-purple tinted leaves. It grows at a moderate pace and is tolerant of a wide range of water conditions. It does require fertilization and CO2 to grow to its full potential. In the aquarium, it is best suited in the midground as the deep purple undersides of the leaves tend to make it a focal point. It can be trimmed by cutting the tops off and replanting them in the substrate where they will grow roots. As a side note, L. aromatica is also used in Vietnamese cuisine as an herb.


Friday, September 22, 2006

Smartest fish: Blue Ram?


I've noticed that my Blue Rams are very, very smart, perhaps the smartest of all my fish. All of them keep a close eye on me when I'm in the room, and if they even glimpse the bright red top of the food container, they start going crazy, swimming up and down the glass. None of the other fish seem to be able to associate the red and yellow container with feeding yet, they just see my hand above the tank. They also seem to be much less afraid of my hand, or anything else for that matter, than any of the other fish. It's pretty hard to scare these guys. They also will learn to feed from your hand! One of them knows exactly what's going on when he sees the net and he quickly hides. I don't think I could catch him unless I removed everything from the tank and chased him around for a bit. Only the net brings this reaction.

Just curious to see what the consensus is. What do you think the smartest fish is? My experience clearly shows Blue Rams are able to associate objects they see with past experiences, a big part of intelligence. Leave a comment and share your experiences!

Jebo 11W UV Sterilizer


Hooray for cheap Chinese imports! I got this handy little UV sterilizer off eBay for $27 (of course I got killed on shipping, but isn't that just the eBay way?) and I must say it is probably the second best money I've spent, the first being upgrading the lights from stock lights. It's not bad quality for a Chinese manufacturer. We've all heard horror stories about the Chinese aquarium products that leak uncontrollably or break in a week due to poor quality. But this seems solidly constructed. The UV bulb itself sits inside a quartz tube which sits inside the black housing. Two o-rings seal the quartz tube and the whole unit. Some people have complained about leaking here, but I think that's just because it may be easy to misplace one of the o-rings. The hose barbs screw in easily, though I've heard if you over-tighten them it can crack the housing, so be gentle. I had no problems. Mine weren't black, but a translucent bluish color, probably because people were complaining that they couldn't tell if the light was on or not. Or it was cheaper. They do glow when the light is on, which I admit is reassuring when you only paid $27.


So I immediatley took it out of the box, assembled it, and put it on my tank (I was suffering from pea-soup syndrome a.k.a green water). It can be hung right on the back of the tank just by the tubing, but this might kink the tubing eventually, so I made a custom plumbing kit out of PVC. This also allows me to easily move it from tank to tank if need be. It can also be installed in-line and it has mounting brackets to do so which handily double as a brace when it's used hanging on the side of the tank. Mine came with a pump included, however I'm not sure if that was just the eBay seller's promotion, so they may not all come with pumps. Don't worry, if you don't get one, you aren't missing out. The thing is a beast, pumping over 275gph. This is WAY too fast for the UV sterilizer to kill anything. It can't be adjusted at all. It also sounds like it must use 30W of power. It doesn't come with a strainer or any sort of protection to prevent fish from being sucked up into it either, which is very likely considering it's got the suction of a category 5 tornado. I had it hooked up for a day with no clearing of my green water problem. I then moved it to my Eheim 2213 output, a meager 100gph, and the water cleared in a few days. There were no leaks or issues and it worked like a charm.


Overall, this sterilizer is a g
reat value for your money if you can find it. It's way cheaper than other UV sterilizers that often sell for $50-100, and the quality isn't half bad. I give it 5 out of 5 fish!


Pros: Rediculously cheap, but fairly good quality. Gets the job done.

Cons: Powerhead provided could toss around even the largest Oscar and is of no use due to its high flow rate.

Thursday, September 21, 2006

DIY CO2 Recipe: Duration vs. Intensity


The second most difficult part about adding a yeast-powered CO2 system to your planted aquarium, after ripping all your hair out trying to find where its leaking (see our article on building your own CO2 generator for step by step instructions on how to avoid this), is to find a recipe that fits your CO2 needs. You can find all kinds of recipes and resources online that tell you to boil containers, add baking soda, use honey, brown sugar, and all sorts of other crazy things. Take it from me: I've tried these and I still keep coming back to a basic recipe and procedure. The main thing to remember is that depending on what proportion you add the ingredients, you will either get very intense CO2 production for a short period of time, or milder CO2 production for a longer period of time. If you add more sugar and yeast, the CO2 production will be more intense, while adding less of both means it will last longer. This is because as yeast create CO2, they produce alcohol which eventually poisons the yeast and kills it. A smaller amount of sugar and yeast means the whole process is slowed down and lasts much longer. I opt for this type of mix, only because I find it a pain to replace the mixes every week, let alone every few days! My recipe usually produces CO2 at a fairly regular rate for about 14 days. It will continue to produce CO2 for at least another week or so, but it will produce less and less each day. This recipe works well in containers of roughly 2 liters (soda bottles, juice containers):

Ingredients:
2 cups sugar

1 tsp baking soda

1/2 tsp yeast (regular dry baker's yeast is fine, see picture)


  • Start with a small cup or bowl and add a small amount of lukewarm water and a pinch or two of sugar. Mix in the yeast with a fork, stirring vigorously until the water is bubbly. This will help to "activate" dry yeast by adding oxygen, preventing mass die-offs that occur if you just dump the yeast into the water. Let this sit while you prepare the container, or for at least 10 minutes, and stir every few minutes to keep the water oxygenated.
  • Rinse out your container if you have used it before to remove all traces of alcohol. Fill it about 2/3 of the way with lukewarm water. Tap water is fine.
  • Using a funnel, add the 2 cups sugar and the baking soda to the water in the container. If you've used the container before, it's likely you don't have a lid you can use to close it up and shake it, so just put the palm of your hand over the opening and turn it upside down over the sink and shake it gently, making sure to keep the seal with your hand. The point is just to dissolve most of the sugar in the water (otherwise it will just sit on the bottom). If you haven't used the container yet, wait to drill a hole in the lid till after you've shaken it up, just to save yourself a sticky hand.
  • If it's been about 10 minutes or longer, pour the yeast and water mixture into the container using a funnel. No need to mix it up, just put the lid on and it should start producing CO2 in anywhere from a few hours (I've had it start in around 1 hour!) to 12 hours depending on how well you activated the yeast.
If you don't have any bubbles after 12 hours, you've probably either got bad yeast or leaks. A leak is much more likely in a DIY setup like this and trust me, it will make you reconsider plunking down $300 for a pressurized CO2 system.

Wednesday, September 20, 2006

Cheap Lighting for Plants: CF Sprial Bulbs

Cheap, high-output lighting options for smaller aquariums are hard to find. Most are at least $80+ and if you've got a smaller aquarium, it's usually because you don't have the money (or the money for more space) for a larger tank. So, here's a cheaper alternative: Compact Fluorescent Bulbs in an Incandescent Hood. Using CF bulbs, you can put together a lighting unit that can give you up to 50 watts in the space of a 12 inch strip light. The benefits of such a unit are a low cost and comparatively high output and you don't have to buy the bulbs from an overpriced aquarium supplier. For this unit, you need:

  • An incandescent strip light - You can use either a full hood like the All Glass Economy Glass Hood (these usually only come in a 10 gallon size) or just the strip light, like this Perfecto Incandescent Strip Light. The benefits of the strip light are that it can be moved and used on any size tank, but it is harder to find in local pet stores and you need to either suspend it (not recommended) or put it on a glass top. It usually costs about $20.
  • 2 Full Spectrum Compact Fluorescent Bulbs - You want the screw in variety, not the ones with pins at the base. They also must not be larger in diameter than the light strip they will be used in. Usually, a 25W bulb is about the largest that will fit, unless you can find the non-spiral U-tube variety: then length and the maximum wattage of the strip is the limiting factor (most are 2 x 25W max). These bulbs are quite hard to find in a full spectrum color temperature. Wal-Mart stores often carry a "Lights of America" brand that offers them in Daylight 5500K. Alternatively, many online light bulb sellers, such as 1000bulbs.com or SpecialtyLights.com offer them in spectrums that will work.
There's no altering or assembly required, just screw in the CF bulbs, put it on your tank and off you go! There are a few important things to remember though. Do not expose the bulbs directly to the water. There should be glass or something in between protecting them from water splashes and condensation. Also, the higher wattage bulb you use, the more heat will be generated (more on this below). In a warm climate with no way of cooling the tank, this may cause temperatures to rise to unhealthy levels. This approach certainly offers the most "bang for the buck," but it is not the most efficient means of lighting your tank. Spiral bulbs are less efficient than linear tubes because light exiting the tube has the possibility of reflecting back into another part of the tube, or may just enter another part of the tube directly. This causes light loss and heat buildup and is known as "restrike." So all 50 watts are not entering the tank, but instead some light is being lost in the bulb itself. I haven't been able to figure out or find a figure on just how much light is lost, but it's not so significant that the light output is seriously diminished. The incandescent hoods often don't have any sort of reflector in them (some have a small metal reflector, but it doesn't do much) so some of the light is lost when it is absorbed by the light housing. Regular tin foil can be used to line the housing behind the bulbs which will slightly increase the light getting into the aquarium, but it will block ventilation, causing the bulbs to run much hotter and reducing their life.

If you are looking for the cheapest lighting option with the highest light output, you should consider a CF Spiral bulb unit. Be aware that it is not the most efficent option, many systems are available that offer highly polished and engineered reflectors that give you the same results with a lower wattage because more light is actually getting into the tank. However, these will definitely cost you more up-front.

Pros: Best "bang for your buck" for smaller aquariums, easy to replace bulbs


Cons: Uses more power, creates more heat, less light actually gets into the tank


Total cost: $48: $20 for Incandescent Stip Light, $8 per bulb, $20 for glass hood/canopy

Monday, September 18, 2006

Hemianthus callitrichoides


Common name: HC
Scientific name:
Hemianthus callitrichoides

Geographic location: Cuba
Temperature: 65F-85F
pH: 5.0-7.5
Light: High (3WPG+)
Growth: Medium
Difficulty: Advanced

Hemianthus callitrichoides is native to Cuba, and thus probably why it's taken so long to become less rare in the hobby. It is a ground cover and has the distinction of being the smallest leaved plant available for the task. It needs higher light and CO2 to flourish and will benefit greatly from regular fertilizing. Often it is bought growing in its emersed state and therefore it is sometimes difficult to get it established in the aquarium. Keeping it anchored in the substrate is one of the most difficult feats, but small pieces of lead wieght can be used to hold it down until it can root itself. The roots are fine and delicate, so avoid disturbing it once it is established. The best way to get your hands on some is to buy it from another aquascaper. Shipping it from nurseries in Asia has mixed results as it does not take kindly to delays in shipping, and costs can become prohibitive. Growing it emersed is one option for growing it quickly. Using artifical light on timers and regular potting soil, growth of this "green gold" is much faster.

My experiences with this plant have been positive. I got my first batch from an online retailer and it was almost dead due to a delay in shipping, however it did eventually grow back. It has grown well in my tanks but it has never really been used yet, it's just been floating around. I'm currently growing it to put into an iwagumi style tank. I have been most successful growing it emersed; I have almost 2 shoebox sized tubs full of it now! I will auction it off on Aquabid when it is mature.

New Filter(s)


Okay, well I meant to buy just one new filter on eBay but somehow I ended up with two. I swear I don't know how it happened, the bids just placed themselves and BOOM, I owe $186. However, it's really not all that bad considering I got an Eheim Classic 2217 and an Aquael Unimax Pro 250. Both are usually at least $120 each, so I figure I got a good deal...right? Anyway, what's done is done, if I don't like one I can sell it again and make someone else very happy. I'm really intrigued about the Unimax Pro 250 because it has a UV sterilizer built into the canister filter. How cool is that? I'm not sure I would use it 24/7 because of energy costs and potential downsides of UV sterilization, but if I need it its there and already plumbed in. I smell two new product reviews soon...

Sunday, September 17, 2006

Online Fish Index

Just stumbled across this great resource, it's a website with thousands of fish, each with pictures, scientific names, and common names. They're divided by family and the site also has salt water fish and cold water fish as well. This is a great resource if you see a fish mentioned here but don't know what it looks like. I'll be posting the link under the links section on the right.

Mulm Farm


So I think I've concluded that my Eheim Classic 2213 is not nearly big enough to filter my 29 gallon aquarium. Even though Eheim states it can be used on up to a 60 gallon tank, I seriously doubt a normally stocked, planted tank would be filtered effectively by the filter. Don't get me wrong, the filter is amazing in every other aspect. It only uses 5W, it's easy to clean, it only needs to be cleaned every 3 months or so, and it just works well. But my tank has 15 fish in it (a little overstocked by the 1 inch of fish to 1 gallon rule) and the Eheim just cannot keep up. Some are very messy fish, like my 3 Bosemani Rainbows and 2 Gouramis, and since I've had it on my tank I've noticed a layer of mulm and debris slowly building up. It's gotten to the point where it has started to actually choke out my Dwarf Hairgrass and Blyxa japonica. The filter claims it has a flow of 116gph, or roughly 100gph with media. This is just not strong enough to keep the debris and mulm from settling on everything, making a mess. Even if I added a power head, I doubt the filter would be able to suck up enough stuff to stop it from being a mulm farm. Either way, it looks like I'm going to have to come up with a solution, which probably means buying a new, more powerful filter.

Saturday, September 16, 2006

Blue Ram - Microgeophagus ramirezi

Male Blue Ram
Common name: Blue Ram, German Blue Ram
Scientific name:
Microgeophagus ramirezi
Geographic location: Venezuela, Columbia

Size: Up to 5cm (2 inches)
Temperament: Peaceful

Conditions: 75-85F, pH 6.5-7.0
Skill Level: Advanced
Minimum Tank Size: 10-20 gallons

Female Blue RamThe Blue Ram is a dwarf cichlid from South America, although it is now captively bred in Europe and Asia. It is a mainly peaceful fish that thrives in well planted tanks with softer water. In the wild, it lives in warm pools that are heated by the sun, so it is tolerant of higher temperatures. These fish are very complex fish behaviorally, which makes them a pleasure to own and watch. Often, they are not afraid of a hand in the tank like other more skittish fish and will hold their own against much larger, more aggressive fish. Males and females look similar, except males have a longer black spike on their dorsal fin and have no blue markings in their black spot on their side. Blue Rams form faithful pairs and are quite easy to breed in the aquarium.

I have owned many of these fish, and they are incredibly beautiful and fun to watch, but require patience, persistence, and advanced fish-keeping skills. Where they are purchased makes a big difference. Only buy them from a reputable dealer, or even better, a hobbyist who has bred the fish themselves. Otherwise they are very prone to carrying parasites or just being weak due to over-breeding and will end up dying in a few weeks. Most come from farms in Asia where they treat them with hormones to make them look more colorful at a younger age. This may lead to all sorts of health problems. It's a good idea to quarantine them before you put them in with other fish and even a preventative parasite treatment, like Jungle Labs Parasite Clear, can eliminate infections and increase chances of survival. Having a full range of medications on hand is advised with this fish, as they tend to get sick easily, unless you get strong specimens.

Blue Ram Pair with FryOnce you get past the difficult first few months, you can start thinking about breeding these fish. I've never been able to successfully breed and raise the fry, the hardest part is getting the eggs to hatch and then finding something small enough for them to eat. They do become quite aggressive once they have spawned, so keeping them in a tank of their own is a good idea. Pairing together a male and female is often difficult; just throwing two together doesn't always make a pair (much like real life!). Spawning can be induced by doing a water change with slightly cooler water (simulating a rainstorm). Eggs will be laid overnight often on a flat surface and should hatch within 7 days. Feeding the fry is difficult because most foods are too big to fit in their mouths, but they will eat infusoria (little bugs present in all aquariums, often too tiny to see) and also microworms. They grow very slowly, and unless you separate the male and female, they will be ready to spawn again in a few weeks and eat all of their young fry! If you can manage to get through these crucial stages, you will be greatly rewarded with healthy rams that can be traded, sold, or used for breeding.

Images used with permission of André Silvestre</font>

Friday, September 15, 2006

Feed Your Addiction

If, like me, you are addicted to aquariums and fish-keeping, you'll love getting new posts delivered to your RSS reader or inbox.

Here's how to subsribe to Aquatic Eden's RSS feed:

In order to subscribe to an RSS feed or newsfeed you will need two things, an RSS reader (also known as a news aggregator) and url (web address) of the RSS feed that you wish to subscribe.

1.) Download a News Aggregator / RSS Reader

2.) Locate the web address (url) of the RSS feed (XML file) that you wish to subscribe. For Aquatic Eden, it's http://feeds.feedburner.com/AquaticEden

A news aggregator or RSS reader is a software application that collects and displays news headlines and summaries from sources that you have designated.

An RSS feed is an XML document that contains the news headlines and summaries.

3.) Install the feed reader or news aggregator on the computer

4.) Insert the url of the news feed (there is usually an "add feed" button)

5.) Many of the news readers will allow you to set the interval that the software will look for a feed update others simply update daily.

6.) The information in the feed will be updated when the feed contains new content.

Welcome to Aquatic Eden


Welcome to Aquatic Eden, my very first blog. Bear with me while I get the hang of this, but as soon as I do I hope to bring honest and decent advice, reviews, and news about freshwater aquariums. Subscribe to my feed for helpful articles, tips, and aquarium supply reviews.

Popular Posts

Sponsors

PetSmart

Planted Aquarium Books