Monday, October 30, 2006

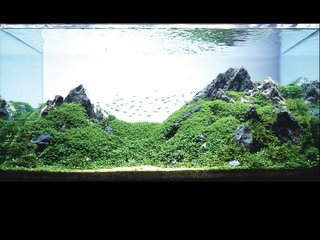
2006 Aqua Design Amano (ADA) Aquascaping Contest Winners (1-10)

Aqua Design Amano (ADA), brainchild of legendary aquascaper Takashi Amano, holds an aquascaping contest each year. This contest is probably the largest event in the planted aquarium community each year and sets the standard for aquarium design. The results of the 2006 contest were released recently, and I figured I'd post 1st-10th place here for inspiration...and to drool over! Enjoy!

1st Place

2nd Place

3rd Place

4th Place

5th Place

6th Place

7th Place

8th Place

9th Place

10th Place

Thursday, October 26, 2006

Methods of Diffusing CO2 in the Aquarium

In order to have any effect on plant growth, CO2 gas must be dissolved into the water of your aquarium. Just letting it bubble out of a tube from your DIY Yeast CO2 generator or CO2 tank will have little to no effect on CO2 levels in the tank, especially if you're using a yeast generator (see the DIY yeast CO2 recipe). This is because larger bubbles don't dissolve as quickly as smaller bubbles. So the ultimate goal of diffusing CO2 into an aquarium is to make the smallest bubbles possible, and them keep them from reaching the surface for as long as possible. You need a reactor, or a device that breaks up the large bubbles into smaller bubbles and mixes it with the aquarium water. Below are the most popular methods for diffusing CO2 in the aquarium:

Bell - (very low efficiency) About the most low-tech way of dissolving CO2 is by using a bell-shaped (or any shape as long as it holds gas) container turned upside-down in your tank. The CO2 tubing is placed underneath the bell and the CO2 bubbles rise up and collect inside the upside-down container. The CO2 dissolves passively and very very slowly. This will give you almost no CO2 concentration in your aquarium just because you can't run the CO2 faster than it dissolves and it dissolves so slowly, plants probably use up the CO2 as soon as it dissolves. One way to make it moderately more efficient is to aim a powerhead or filter exhaust across the bottom of the bell (the open end). This diffusor can be made quite easily at home.

Airstone - (very low efficiency) This is probably the second least efficient way of dissolving CO2 in your aquarium, but with a little ingenuity it can be made more effective. Try to get the airstones that create the finest bubbles. Limewood airstones are best, but they clog fairly quickly. These make fairly small bubbles, but to be really effective you have to keep the bubbles from racing up to the surface and escaping. Try to position the airstone as deep as possible. You can also put the airstone under the intake or exhaust of a filter or powerhead to trap the bubbles and send them with the current, thus keeping them in the water for longer and increasing the efficiency.

Glass Diffusor - (low to medium efficiency) One of the most popular methods due to its ease and low cost, it is slightly better than a regular airstone, although it is basically the same principle. A ceramic disk emits fine bubbles, finer than an airstone. However, this disk can collect dirt and debris and become clogged with algae, creating much larger bubbles and reducing its efficiency. A soak in bleach will help to clear the blockages. Again, try to position the glass diffusor as deep as possible in the tank. It can also be made much more efficient by placing it under the intake or exhaust for a filter or powerhead. Glass diffusors often need higher pressure to work and they may not work well or work at all with DIY yeast CO2 systems.

Bubble Ladder - (low to medium efficiency) This is another inexpensive, simple option which consists of a series of zig-zagged ramps or a twisted ramp placed on upright on the side of the aquarium. CO2 enters from the bottom and the bubble is forced to travel along these ramps to reach the surface. Meanwhile, the movement helps to dissolve the bubble. These work by extending the amount of time the bubble takes to reach the surface, thus giving it more time to dissolve. However, the bubble is rarely completely dissolved by the time it reaches the end of the ramp and is allowed to escape to the surface. The downside to these is that they are often big, bulky, and ugly and there is no real way to hide them.

Filter or Powerhead Intake - (medium to high efficiency) Perhaps the easiest high efficiency option is using a filter or powerhead as a reactor. All you need to do is put the CO2 tube into the intake of either a canister filter or powerhead. The motor will suck up the bubbles which will be either immediately pulverized by the impeller (powerhead) or drawn through the filter media, dissolving rapidly along the way due to the high flow, and then into the impeller (canister filter). Most ot the time when using a canister filter, you won't even see the bubbles coming out of the exhaust as almost all of the CO2 is dissolved. A powerhead is a little less efficient, as it just spews the fine bubbles into the tank and some of these rise to the surface and escape, but not before taken on a wild ride around your aquarium. Depending on the filter or powerhead, the CO2 bubbles can make a fairly loud ticking or whooshing sound as they are met by the impeller blades, and some aquarists may find this too annoying.

In-line Reactor/Counter-flow Reactor - (high to very high) These can be DIY or bought, but tend to be quite expensive to buy or labor intensive to make. However, they can't be beat in terms of efficiency if they are working correctly (another issue if you build it yourself). It's basically a chamber connected to the exhaust of a canister filter or powerhead placed vertically. The lower end of the chamber is often left open or covered with a sponge, unless it is an in-line design, where the bottom is connected to tubing that returns to the tank. The CO2 is released into the chamber, and as it tries to rise to the surface, it is pushed back by the flow of water. Even if it makes it to the top of the chamber, it has nowhere to go but back into the flow of water (the top of these chambers is often shaped like a funnel to force the bubbles back into the flow). To make it more effective, bio-balls or other oddly shaped filter media can be put inside to help break up the CO2 bubbles as they are tossed around. The biggest problem with these reactors is that since they don't have any effective means of breaking up the larger bubbles, if too much CO2 is pumped in and the flow isn't strong enough, the bubbles collect and form larger bubbles which dissolve much slower. So balancing the flow of the water and the flow of CO2 is critical to achieving optimal diffusion.

Wednesday, October 25, 2006

Build Your Own Yeast CO2 Generator

The easiest way to provide your planted aquarium with CO2 gas (a vital fertilizer) is to make your own yeast powered CO2 generator. This can be done very easily and inexpensively (all you need to buy is tubing and the supplies for the yeast recipe). Below are the tools and supplies required:


Any juice container will work, or any container with a tight fitting lid for that matter. However, some containers work better than others. I've always had good results with juice containers whereas some of the othe containers I've tried (like the big iced tea jugs) don't make an airtight seal when closed. You can use any size, however 48-64 ounce containers are a good size. They fit the 2 cups sugar called for in most recipes and don't take up a huge amount of space. The bigger the generator, the more water there is which dilutes the alcohol byproduct that eventually kills the yeast, so larger containers will last longer as long as you add the same amount of ingredients. The tubing can be any kind of airline tubing, however standard airline tubing will eventually go hard and crack from exposure to CO2. Using silicone or CO2 resistant tubing is best. A drill is nice, but if you don't have one, the same result can be acheived with a nail or screw.

Step 1
Drill a hole in the lid smaller than the diameter of the tubing, but large enough so you think you'll be able to squeeze it through. I use a smaller drill bit and then widen the hole with a pair of aquarium tweezers. Remember you can only make the hole larger, so don't get overzealous.

Step 2
Cut the end of the tubing on a diagonal and push it through the hole in the lid as shown, using tweezers or pliers to grab it on the other side and pull it through. If it doesn't seem to fit, make your hole bigger. If you don't need pliers or tweezers, the hole is too big and CO2 will leak out. If this happens, you need a new container (or at least a new lid). Pull it through only a half an inch or less.

Step 3
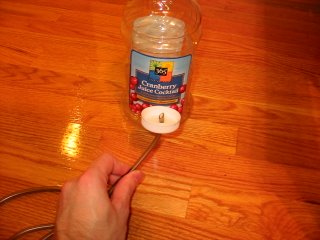
This is the finished cap and tubing. The seal should be tight enough to prevent leakage. There is no need for glue or silicone if it is done right. Just screw the lid on and you're ready to mix up your yeast solution!

The Final Product: A DIY Yeast Generator

There are a few important things to remember about DIY yeast generators.
  • First, they are under pressure. Although it is highly unlikely they will burst, it does happen if the tubing gets clogged. Make sure the gas has a clear path to your tank. Some people add a check-valve between the tank and the generator to prevent yeast bubbles and goo from going up the tubing. Personally I've never had this happen and adding a check valve only makes another possible leakage point. As long as you don't overfill or shake up your mixture, it shouldn't get into the tubing.
  • Also remember that if you squeeze the bottle (even gently), once you release it, it will suck up aquarium water. This can form a siphon and once it does, aquarium water will flood your generator. This will ruin the reaction (other bacteria and organisms in the water will out-compete the yeast) and can make a big mess. So be careful and set the generator down before screwing on the lid and connecting it to the tank.
  • Finally, a DIY yeast generator is a rather low powered CO2 generator, so diffusing all that CO2 most effectively and stopping leaks is paramount. One leak can make the whole thing not work. A cheap idea for diffusing the CO2 in the tank (called a reactor) is to put the tubing from the generator into the input of a powerhead or canister filter. The impeller will suck up and pulverize the CO2 bubbles, creating a fine mist that will dissolve much faster. Look for an article soon on the different type of CO2 reactors!

Tuesday, October 24, 2006

Top 3 Mistakes When Starting a Planted Aquarium


For those of you starting out in the world of planted aquariums, I've picked my top three mistakes I've seen people make when starting an planted aquarium or converting a fish-only aquarium to include live plants. Consider this a crash-course in starting a planted aquarium. Most of these mistakes lead to the plants dying within a few weeks and, for those of us who don't give up easily, the process is repeated until either our patience or pocket is depleted. Often this is compounded by bad advice given by people at pet stores who often don't know a thing about plants, and even sell plants that aren't true aquatic plants. I'm sure many a potential planted aquarium enthusiast has been lost due to bad advice and these three mistakes. Here they are:

1. But it looks bright! - Often people try to grow plants under the light fixtures that come with an aquarium or come standard in a cheap hood. More than likely, this is a single fluorescent bulb, usually no more than 15 or 20 watts (steer WAY clear of incandescent, they just waste energy, heat your aquarium, and grow algae). The most critical element needed to grow live plants is light. Plants need light to photosynthesize, and without it, they may last a few days or a few weeks on their energy reserves, but eventually they will die. Many people are also mislead by bad advice into believing that the light that is sold with aquariums is adequate. The standard lighting that comes with an aquarium will typically only grow Java Moss and maybe Java Ferns and very poorly at that. If you like ugly, lanky, unhealthy plants go ahead and try it. No matter how bright it may look, it is not enough light. Plants only use specific colors of light, usually in the red and blue ranges. Humans perceive green as brightness. Therefore, what appears bright to us may not actually be helpful to plants. Always choose full spectrum lighting or specific plant growing bulbs, and at least 1.5-2 watts per gallon (WPG) is needed to grow the most basic of aquatic plants in an aquarium. Although this is not set in stone and the watts per gallon rule gets distorted with really small (under 10 gallons) or really big (over 75 gallons) aquariums, it is a good rule of thumb. The following breaks down what ranges qualify as different levels of light:
  • 0-1.5 WPG - Extremely low, pretty much nothing will grow
  • 1.5-2 WPG - Low, basic hardy aquatic plants will grow slowly
  • 2-3 WPG - Medium, most aquatic plants will grow fine
  • 3+ WPG - High, almost any aquatic plant can be grown
What must also be taken into account is the related effect of light levels on a plant. This brings me to mistake number two.

2.
But I thought high
light = a beautiful aquarium! - Say you splurge and buy an expensive high output light fixture for your aquarium. Throw some plants in and sit back and watch it grow, right? Wrong. Light in an aquarium is like the gas pedal in a car, the more you push it the faster you go, but the quicker things get out of hand, and when it does get out of hand it gets ugly. Having high light is not always best, especially for someone who's new to planted aquariums. A basic understanding of a plant's metabolic process is required (don't worry, I won't go into details). It takes a bunch of raw materials and energy and outputs a finished product (new growth). Raw materials are fertilizers, chemicals needed for growth, and energy is light. If it runs out of any one of these inputs, the whole thing shuts down, and more importantly, it can only go so fast. So when you throw a plant under high light, it immediately kicks the internal mechanisms into high gear. The plants just shut down when they run out of any one of the many chemicals needed to grow. If you don't fertilize your tank, you will quickly find that all high light does by itself is grow algae, and lots of it. Fast. Real fast. For this reason, if you're just starting out, my advice is to get a medium or low light setup. You don't have to fertilize as much (if at all with a low light setup) and things won't be moving at such a fast pace (and thus get out of control so quickly). It's very hard to recover from a serious algae bloom because once it's taken hold, some types are impossible to remove. I've heard horror stories of people being forced to totally break down their tank because of algae. You've got to stay on top of it from the start.

3. But it was being sold as an aquatic plant! - Many fish stores sell aquatic plants. The problem is, many also sell plants that are not true aquatics. Often these can be found in big-box chain pet stores, where they make up 30-50% of the plants sold. Even at the local fish store, unless there is a dedicated employee who knows his or her facts, non-aquatic plants can be sold to an unsuspecting aquarist. Why these plants are sold as aquatic plants is beyond me, but I doubt it falls far from someone wanting to make a quick buck. They will survive fine underwater for a few months, maybe even a year, but they will steadily
decline until they finally die. Since they are not true aquatics, they cannot survive submerged for long periods of time. The only way to avoid these plants is to educate yourself. Certain plants always seem to pop up:

  • "Mondo Grass" Ophiopogon japonicus - This is a bushy grass with dark green leaves.
  • "Purple Waffle" Hemigraphis colorata - Dark green broad leaves with purple undersides.
  • "Aluminum Plant" Pilea cadierei -Dark green leaves with silver markings on the foliage.
Steer clear of these, you are just wasting your money, despite how pretty they may be. Can you imagine what would happen if fish stores were selling non-aquatic animals to put in your fish tank? Only by not buying these plants can we discourage fish stores and their suppliers from passing these off as true aquatic plants.

As long as you avoid these three mistakes, you should get past the inital transition into the wonderful planted aquarium hobby. Then you can start upping the ante and experimenting with fancy rare plants and high tech setups. It's a steep learning curve, but do your research and you will be rewarded with an aquarium that exploding with life and color that you just can't take your eyes off of!

Monday, October 23, 2006

Maracyn Can Kill Malaysian Trumpet Snails


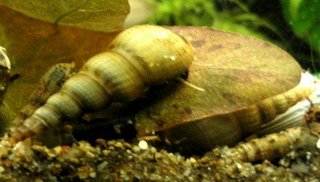
It seems to be confirmed: dosing Maracyn (not Maracyn 2), an antibiotic, to combat Blue-Green Algae in my aquarium has killed off all of my Malaysian Trumpet Snails. I dosed exactly according to the package. I don't know how or why it killed them all, but there are empty shells everywhere and I haven't seen one live snail in weeks. Others I've talked to have said that they've used Maracyn to treat their aquariums and their MTS have been fine, however there was no other change in the aquarium that could have done it. The shrimp were fine so it wasn't nitrites or ammonia and they started acting sick almost immediately after the first dose. Other snails in the aquarium including pond snails and mini-ramshorn snails were unaffected.

I'm curious to see if anyone else has treated their aquarium with Maracyn and what effect if any it has had on their MTS. Leave a comment and let me know!

Saturday, October 21, 2006

Plant Eating Fish

Just as a warning for anyone looking at fish for a planted aquarium, don't trust what you read in terms of fish and whether or not they will eat plants. I have some Rummynose Tetras in a planted aquarium and couldn't figure out why my Hemianthus Callitrichoides wasn't growing until I took a closer look and realized that it was being eaten. I couldn't understand why...I'd never heard of tetras eating a plant before, until I asked around online and found out that they do eat smaller leaved plants, like Glosso and HC. Up until now, I'd believed that only Silver Dollars and some hungry Plecos would eat plants. Since then I've been feeding them much more and they seem to be leaving the HC alone. So just as a word of caution, keep your fish well fed, even if they aren't supposed to eat plants, as they may discover they're a tasty snack.

Thursday, October 19, 2006

Vesicularia montagnei "Christmas Moss"


Common Name: Christmas Moss, Xmas Moss
Scientific Name: Vesicularia montagnei
Geographic Location: Unknown
Temperature: 65F-77F
pH: 5.0-7.5
Light: Low (1.5WPG) to High (3WPG+)
Growth: Slow
Difficulty: Beginner

Christmas Moss is as mysterious as some of the other mosses in the aquarium hobby. There is no consensus on its geographic origins and even the scient
ific name has a tendency to change. Its growth habits and appearance are just as varied. When grown attached to a piece of driftwood or rock, it forms triangular fronds in the shape of Christmas trees (hence the common name). If allowed to grow free floating, it tends to have a much less organized appearance and the triangular fronds are much less pronounced. In this form, it is often confused for the much more common Java Moss. In lower light, it grows much less densely, and again, is often much less organized in structure. Only under higher light conditions, attached or anchored to an object, does Christmas Moss show its true structure. It will form a pillowy bush of triangular fronds that is very attractive and undemanding.

This moss is very easy to grow in the aquarium, as it will grow with almost
any amount of light. Although not as hardy as the legendary Java Moss, it will survive with low light and no CO2. Growth will not be the ideal structure and will be considerably slower, but it will still live. Like other mosses, Christmas Moss prefers cooler temperatures, under 77F. Over this, it tends to suffer, growing more slowly.

As an aquascaping element, its uses are limited to covering hardscape (rocks, driftwood) or creating a moss wall. A moss wall is created by sandwiching the moss between two pieces of mesh and placing this in the back or sides of a tank. The moss eventually grows through the mesh and covers it up, creating a wall of attractive triangular fronds (as seen in the picture above). It can be used as a carpeting plant, however this is not recommended, as it easily gets choked with mulm and debris and becomes an algae magnet.

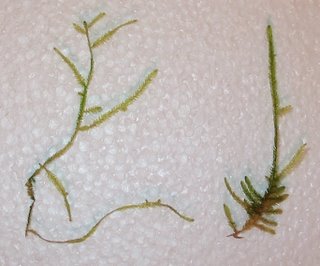
Christmas Moss is best bought from other hobbyists who have it growing under ideal conditions in their own aquariums (thus making identification easier). Getting it in a local pet store or online can be risky, as Java Moss can be passed off as Christmas Moss at less than reputable establishments. Christmas Moss can be identified by its more regular branching pattern and slightly different leaf shape. In the picture below, the moss on the left is Java Moss and on the right is Christmas Moss.


Shrimp and fish fry use it as cover and it is also an excellent source of food for both, harboring tiny infusoria (bugs). Overall, Christmas Moss is an excellent plant for covering hardscape, filling in gaps, and creating living backdrops in any aquarium.

Tuesday, October 17, 2006

Blyxa japonica


Common Name: Blyxa japonica
Scientific Name: Blyxa japonica
Geographic Location: Southeast Asia
Temperature: 68F-78F
pH: 5.0-7.0
Light: Moderate (2.5WPG) to High (3WPG+)
Growth: Moderate
Difficulty: Beginner

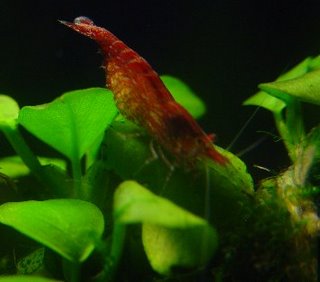
Blyxa japonica is a great plant for aquascaping. It is not very demanding, only needing moderate light and CO2 injection, and it forms such beautiful grassy effects. Widely used by Takashi Amano in his nature aquariums, this plant prefers acidic water. It is in fact, not a grass-like plant, but a stem plant with a tiny distance between leaves on the stem, creating a look of grass. In higher light, newer leaves will turn a goldish-red color. This can be one of the most frustrating plants to get rooted however, as they are very buoyant and are slow to grow roots to hold themselves in. Once you get a few plants rooted though, they will grow new shoots out of the base which can be trimmed off and replanted to propagate the plant. It appreciates a nutrient rich, fine substrate since it is a heavy root feeder. It fits well in the midground or foreground of a larger aquarium and can even become a background in a smaller tank. The plant will get about 4-5 inches in height when mature.

The best place to get this plant is either from another hobbyist or from an online plant retailer. It ships relatively well, provided it is packaged well since it is fairly fragile. Finding it at a local store is highly unlikely. However, I highly recommend this plant for its aesthetic beauty and easy care.
Monday, October 16, 2006

Freshwater Biotope vs. Saltwater Reef


I've always thought that keeping a well balanced planted biotope tank is probably harder than any reef tank and takes more knowledge of ecosystems and the living things within them, but Matt Clarke put it beautifully in his article about freshwater biotope aquariums on Practical Fishkeeping's Blog:

Therefore, it has always struck me as a little odd that marines are considered the pinnacle of the hobby, yet many marine fishkeepers probably couldn't tell you where in the world their fish came from, let alone their corals.

Many (not all, I am sure) marine fishkeepers know little about the biology, taxonomy or reproduction of their fish. Ask the same questions to a freshwater enthusiast and they'll often be able to tell you about it in great detail.

Maybe the reefkeepers could do with learning a trick or two from the freshwater enthusiasts?

I think well thought-out planted biotope tanks are becoming the new reef-tank. True, the general public still doesn't know the difference. The last party I had, the guests kept asking me if my planted tank was saltwater. It's just reassuring to know that you can make a freshwater tank that rivals the beauty of a potentially much more expensive and flashy saltwater tank. Go freshies!

Sunday, October 15, 2006

Microsorium pteropus var. Narrow


Common Name: Narrow-leaf Java Fern
Scientific Name: Microsorium pteropus var. Narrow
Geographic location: Southeast Asia
Temperature: 64F-84F
pH: 5.0-8.0
Light: Low (1.5WPG) to High (3WPG+)
Growth: Slow
Difficulty: Beginner

The Narrow-leaf Java Fern is a relatively new plant on the aquarium scene. It is a variation of a regular Java Fern that has much narrower, longer leaves. The leaves never get wider than a centimeter or two (less than 1 inch) but otherwise the growth requirements are just as easy. It doesn't need a lot of light and will survive in just about any amount. However, it will do best in medium to high light. It can tolerate almost any temperature and any pH, just like the regular Java Fern. It also grows quite slowly, but does not need CO2 or large amounts of fertilization. It is ideal for placement on driftwood or rocks as it roots onto objects and does not need to be (and should not be) planted in the substrate.

The true beauty of this plant is its ease of care combined with its unique long wavy leaves. If grown in bunches, stands of these leaves add a wonderful affect to the aquascape. Or, you can plant a single plant on driftwood and have it grow long leaves and look like a tall grass. Either way, it is virtually indestructible. Propagation is easy, simply split the rhizome or separate plantlets that form on the ends and undersides of leaves. The only things to watch out for are to make sure you don't bury the rhizome (the big root/stem that all leaves sprout out of) in substrate and make sure it doesn't get covered in algae as it is a slower growing plant. You can't go wrong with this easy to grow, beautiful variation on a Java Fern.

Wednesday, October 11, 2006

Super Nano Aquariums


I just found these Zen Vases today, they're from CB2 and they're flower vases, but would make perfect super-nano aquariums. They range in size from a 0.2 gallon cube to a 1.2 gallon long tank. They are frame less, trendy, and would make perfect coffee table or desktop aquariums. As long as it is an area with lots of natural light, you could do without a light fixture. Java moss, Anubias nana var. "petite," Java ferns, and other low to medium light plants with smaller leaves would be great plant choices. A filter isn't needed either, since doing a water change would take 30 seconds with a cup and could be done twice a week. Snails could keep algae to a minimum, a few shrimp or one or two small fish (tetras or barbs or even a Siamese Fighting Fish) could be added as well if you wanted to add fauna.

Check out this living desktop moss decoration idea as well using Stringy Moss.

These super-nano aquariums are blurring the line between hobby and decoration, and are so cheap and add so much life to a room. Plus, creating an aquascape this tiny takes great skill! For a great article on setting up a nano aquarium, check out this article from Practical Fishkeeping. Happy nano-scaping!

Tuesday, October 10, 2006

Blue Green Algae (BGA)


Causes: Low nitrate levels (NO3), "dead spots" of low water circulation, organic waste build-up
Prevention: Dose nitrates (NO3), add powerheads to aid circulation, frequent water changes and do not over-feed
Eradication and control: Maracyn dosage, according to package instructions
Alternative eradication and control: 3-5 day blackout


Blue Green Algae (BGA) isn't like other types of algae you may experience in the aquarium. First, it is not actually algae but rather a photosynthetic bacteria. Secondly, it can fix its own nitrogen (as a result of this complex chemical process, oxygen is toxic to it), and finally, it has different life-stages. This is all very relevant to how it can be combatted and removed from the tank, where if untreated, it will envelop healthy plants and kill them by blocking out the light.

In its most common form, BGA is floating around in your tank waiting to land in an ideal location. It is microscopic and harmless until it moves onto its next life-stage. This is where water circulation comes in. If it finds a dead spot with low oxygen and lots of organic wastes (these usually go hand in hand in a dead spot), it will settle down and begin a colony. Since it can fix its own nitrogen, a lack of nitrates gives it an advantage over plants. If nitrates are not high enough, it will quickly find a dead spot to start a colony and begin growing extremely rapidly. Once it gets its foot in the door, it's very hard to combat without antibiotics or the most severe weapon in an aquarists arsenal, a blackout.

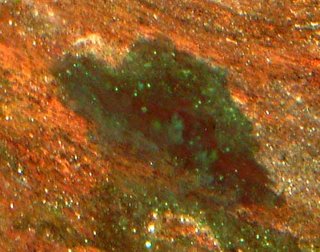
When in this second life-stage (the colony), it appears as a slime-covered green, bluish-green, or brown patch. If you try to remove it, it tends to stick together in big gooey pieces and it has a very strong smell. The slime is the protective membrane the bacteria forms around the colony. Removing it manually will only temporarily help. In fact, removing it manally tends to make it grow back faster. Since it is bacteria, there is no way to get all of it out of your tank. Dosing nitrates will not have any effect on it now, since it has gained a foothold. It may even cause it to grow even faster (this is what happened to me). Increasing water circulation may or may not work, since the protective membrane protects the colony against oxygen.

At this point, your only options are to treat it with a 5 day course of Maracyn, do a 3-5 day total blackout, or tear down your tank and sterilize everything. I don't think anyone chooses the last option unless they're really sick.

Maracyn is erythromycin, an antibiotic effective gainst Gram-negative bacteria. Follow the dosage given in the instructions. Some people are worried about damaging the biological filter of beneficial bacteria. This is very unlikely, as stated on the Maracyn instructions. Instead, people who claim it did damage their biological filter and point to nitrite spikes are often seeing the results of millions of dead cyanobacteria, not beneficial bacteria. These nitrite spikes are often temporary and can be alleviated with water changes whenever levels get too high. The tank should balance out within a week. If the biological filtration was damaged, it would take much longer for these spikes to go away.

The other alternative is a blackout. I don't recommend this, but if you are against using antibotics or have something in your tank that is sensitive to antibiotics, this is your only option. Just use towels or black garbage bags to block out all light from the tank (not even a tiny crack) and turn off the lights for the duration of the blackout. Leave the tank blacked out for 3-5 days. It will hit your plants hard, some more than others, and plan on loosing some. Although the majority will come out alright, it will take a week or two for them to recover and begin growing again. Obviously it depends in your plants in your tank and how healthy they are going into the treatment.

Monday, October 09, 2006

Ludwigia inclinata var. verticillata "Cuba"

Photo copyright Oliver Knott

Common name: None
Scientific name: Ludwigia inclinata var. verticillata "Cuba"
Geographic location: Cuba
Temperature: 72F-84F
pH: 5.0-7.5
Light: High (3WPG+)
Growth: Fast
Difficulty: Advanced

Ludwigia inclinata var. verticillata is a beautiful stem plant. Its whorls of copper colored leaves can add a bouquet of color to any aquarium, but this plant is not for the beginner. It is very demanding in terms of light and fertilization. CO2 is a requirement as is regular NPK and trace element fertilization. Without CO2, the plant will have larger green leaves and will grow much more slowly and less full. It is a heavy iron user, and if new leaves are pale or white, the plant is not getting enough iron. It also demands high light, at least 3 watts per gallon. Each stem can reach 4 inches wide, so adequate space is also a must for this plant. It will quickly outgrow most smaller aquariums. When the ideal conditions are provided, this plant will grow very fast and will form multiple branches and side-shoots. Trimming it can be difficult, however, since it does not handle frequent trimming well. If topped, the rooted portion may wither and die. Therefore, most aquascapers will remove the rooted portion and just replant the top.

Below, you can see the variations induced by different conditions. Most likely, the differences between the two pictures is caused by lower trace dosing, lower light and CO2 (left) and higher trace dosing, higher light and higher CO2 (right).


Although I don't have any experience growing this plant myself, I hope to very soon if I can get my hands on some trimmings. I also expect I will need to upgrade to pressurized CO2 first in order to get the CO2 concentrations necessary for healthy growth. All of the accounts I have heard about this plant though have been that it is a beautiful plant that grows like a weed if given the right conditions.

Sunday, October 08, 2006

Cherry Shrimp - Neocaridina denticulata sinensis


Common Name: Cherry Shrimp, Red Cherry Shrimp, RCS
Scientific Name: Neocaridina denticulata sinensis var. red
Geographic Location: Taiwan
Size: Up to 3cm (1 inch)
Temperament: Peaceful
Conditions: 60-82F (ideally 72-78F), pH 6.5-7.5

Skill Level: Intermediate
Minimum Tank Size: 2.5 gallons

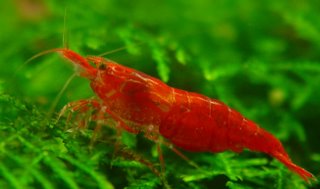
Cherry shrimp are some of the easiest shrimp to keep and breed in the aquarium. Often called Red Cherry Shrimp or RCS, these shrimp thrive in planted aquariums, where they eat algae. Juveniles should be purchased, as they adapt better to new aquarium conditions, and at least 10 should be purchased to ensure a mix of males and females. Males are often mostly clear with just a few red stripes and are smaller than females. Juvenile females are similar to males, but as they reach 2-3 months old they develop a solid red color. Around the same time, they should become pregnant with yellow-ish eggs. They carry these eggs around with them in their swimmerettes for roughly 30 days. Unlike other shrimp, the eggs hatch into miniature versions of the adults (there is no intermediate plankton stage). The baby shrimp are very small and are easily eaten by other fish or sucked up into filters. Therefore, if you want to breed these shrimp in any significant numbers, keeping them in a tank of their own with a sponge filter is the best option. Most smaller fish should leave them alone, but do not mix them with fish that have mouths large enough to eat the Cherries, otherwise they may become a snack. Shrimp are also a favorite snack of loaches and puffer fish. Other dangers include ammonia and nitrite. These shrimp are highly sensitive to these two, and will be the first to die if there is a spike in either.


I've kept Cherry shrimp on and off for about a year now, and they are definitely worth having a tank of their own. They eat algae (and are therefore a handy cleaning squad for any algae covered plants you put in their tank), they are colorful, easy to breed, and are entertaining to watch. They are vulnerable to larger fish and chemicals though, so be careful what you put into your water (copper can also prove lethal to these invertebrates) and if you want to expand your flock, keep them in a tank without other fish to snap up the babies.


The best place to buy Cherry shrimp is online through other hobbyists. They are readily available on Aquabid and through various aquarium forums, often for less than $2 a shrimp. They ship very well too, and can tolerate temperatures as low as 60F. Keep them well fed with algae or algae wafers and keep the water quality high and you will be rewarded with more Cherries than you can give away (or sell)!

Saturday, October 07, 2006

Aquarium Update: H. Polysperma, Driftwood


I certainly am pleased with how the tank is looking, even with a bare side. I've never seen the H. polysperma look so nice and bushy! It makes quite a nice center-piece. Before, I was considering replacing it with the L. Aromatica once it got big enough, but now I'm not sure I want to.


I've also been considering adding some thin driftwood branches, if I can get my hands on them. Just a simple layout with the branches coming out from the center of the taller plants, maybe with some moss on them. The problem is getting just a few branches without order a whole bunch from manzanita.com!


In other tank news, the female ram that had the fry got sick and died yesterday. I tried to help her, she looked like she had dropsy (all puffed up and not eating) but even with medication she didn't make it. I've decided to give up on Blue Rams for now, the ones I can get easily are just far too fragile. I've never had any survive very long. I'll wait till I can have a dedicated tank set up for them and get strong healthy fish from a breeder. Such pretty fish though, it's so hard to say no to them.

Wednesday, October 04, 2006

Aquarium Update: Driftwood Removed

Over the past few days I've been staring at my 29 gallon tank (the one that I took the moss out of) and I didn't really like the driftwood. It was one of those purchases made way before I found any of the cool websites or forums devoted to aquascaping that frown on such hulking, man-made decorations, but I always held out hope that I could work it into something. Eventually, it was just enveloped by the moss and it disappeared. When I trimmed the moss though, there it was again, as ugly as ever. So I decided to take it out of the tank.

Easier said than done. You see, it was in the tank when it was placed on my tank rack and I never thought about what if I had to take it out in the future. I figured I would have to take off the lights hanging above the tank, which wasn't so bad. But when I tried to get it out, I realized the low clearance was going to be a big pain in the butt. You see, this isn't the real Malaysian driftwood that actually sinks by itself. This has a big slab of slate screwed to the bottom to hold it under. After some fancy maneuvering and some not so gentle coaxing, I managed to get the piece out.

I rearranged only a few plants (I'm going for the "island" look) and this is what I have:


Boy what a difference. The tank looks 10 times bigger. It looks brighter and wider and just nicer overall. I haven't decided what sort of ground cover to put on the left side, either dwarf hair grass like the right or something different. I think I may try Glossostigma elatinoides just to see what it looks like, and if I don't like it I'll rip it up. The left side needs to grow in a little, obviously since that's where the wood was, but I'm definitely pleased with the new scape.

A word of advice: Never buy driftwood with a piece of slate screwed to the bottom; it's not real driftwood, and chances are, it's manufactured and will always look that way.

Monday, October 02, 2006

Maracyn May Be Making Snails Unhappy

When it comes to snails in the aquarium, there's just no easy way to get rid of them. You either have to tear down your tank and wash everything, get a fish that eats snails but potentially harasses your other fish (like a dwarf puffer), or manually try to remove them all (yeah right!). Chemical treatments are bad because they can kill other things in your tank like plants, other invertebrates, and even fish.

Imagine my surprise when I noticed that all of my Malaysian Trumpet Snails (MTS) were either simply not happy or dying after beginning a treatment to kill a Blue-Green Algae outbreak. I'm still investigating, but soon after I began adding Maracyn (a simple antibiotic) to the tank, all the snails came out of the substrate and closed themselves up in their shells. I saw one or two just laying on the substrate upside down, motionless. Now I'm not 100% sure they're dead, and nor am I sure it was the Maracyn treatment that caused it, but there must be a link between the two. Invertebrates are usually more sensitive to nitrites than fish (killing the algae could cause a nitrite spike). The shrimp in the tank are doing fine though, so it's not something that particularly affects invertebrates, just these snails. There are a few smaller rams horn snails as well that seem to be doing fine.

I'll ask around and see if anyone has any more information on this. If Maracyn does kill MTS, I'm sure it would make a lot of people happy. They are notorious for being one of the hardest types of snails to get rid of, although they are highly beneficial for the substrate of a tank.

Aquarium Update: Heavy Trimming

Alright, well I've been busy this weekend and did a few major trims. First, the 29 gallon:

Before (August 06)

After (October 06)

I decided to do a major trim of the Christmas moss and took out a mass as big as my head (now for auction on Aquabid). The previous "Christmas Tree" look was pretty but the moss was collecting a lot of dirt and debris and the moss on the top closest to the light was attracting algae. It was also starting to choke out everything underneath it (note the scraggly Rotala right in front of the driftwood!). It also wasn't even attached to the wood anymore. I just grabbed it and it came right off. I left a few handfuls in the tank but tucked it behind the driftwood where I hope it will attach more. I'm also trying my hand at Java Fern again. Supposedly a plant that anyone can grow, mine just seems to fester and rot, although it is one tough plant. All of mine was enveloped by the moss and surprisingly survived on little or no light! I've placed what remains of it on the driftwood hoping it will grow back bushy and green. The "Before" picture is also before my green water outbreak, so that's why there is so little change in 2 months. The tank is just now recovering. At least the fish seem to like the open area a little better!

For the 10 gallon I trimmed it way back as well:

Before (September 06)

After (October 06)

Since the Ram's spawn was eaten I figured I'd better spruce up the tank now that I don't have to worry about disturbing them. I gave the Hemianthus micranthemoides a bit of a flat top on the right, but I'm trying to get it to make a compact bush. The needle leaf Ludwigia in the center is growing well, as is the needle leaf Java Fern (unlike the Java Ferns in my 29 gallon!) I also added a planting of Micranthemum umbrosum on the far right to add some color to that side. The moss wall was trimmed back as well. The Glosso in the front is not doing well and I have no idea why. It used to be a thick carpet, but it slowly died off and is now reaching for the light. I'm thinking about replacing it with something else, maybe Hemianthus callitrichoides or dwarf hair grass.

As for the 20 gallon long, I'm wrestling with a bit of the notorious BGA (blue green algae) so it's not all that pretty right now. Plus I haven't scraped the algae off the glass in forever...it's still balancing out (it was started about 3 months ago). I'll post pictures once it's decent!

That's it for this update, leave me some comments on the tanks!

Popular Posts

Sponsors

PetSmart

Planted Aquarium Books